Wednesday 31 October 2012

WOYWW...

Another week, another Wed and time again to browse the desks of the creative and crafty of the world curtesy of the lovely Julia over at Stamping Ground!

This week my desk is looking pretty full.... I have a stall at a craft fair in Skegness on Sun so I am busy boxing up display items ready to go.


This is a very early morning photo so I'm hoping by the time you all see this I will have moved the boxes and be busy doing the last bits of admin ready for the day. Sounds very organised I know but the Nutty one is away alot at the mo and with the kids off school its better to be ready early (or it may not get done lol)

Hope you all have a fab Wed and till next time - Happy Crafting

Monday 29 October 2012

Book Tree Tutorial...

As promised to some of my lovely blog readers here is a tutorial on how to make the gorgeous 3d tree featured in the last post.

I must firstly say this is not my design, in fact you can find it out there in Blogland if you look. I saw this demonstrated at the lovely Jo Channon's shop in Coningsby, Lincolnshire. A lady called Shelly showed us how to do it and I just knew I would have to make one (ok, several!) for myself.

I hope the photos explain how to fold the pages. If you have any queries please contact me using the button at the side.

So, first you need to get an old, well read book. It needs to be a paperback as the spine is bound with glue instead of a hardback. Now for the scary part.... Tear the front and back cover off!

 Remove the first few pages as they contain very little writing and they will leave blank edges to your tree. You now need to remove approx 160 pages in a solid chunk. The taller the book the more pages you will need to fill the tree. The tree in the previous post was from a book approx 7" tall.  Your book should now look like this....

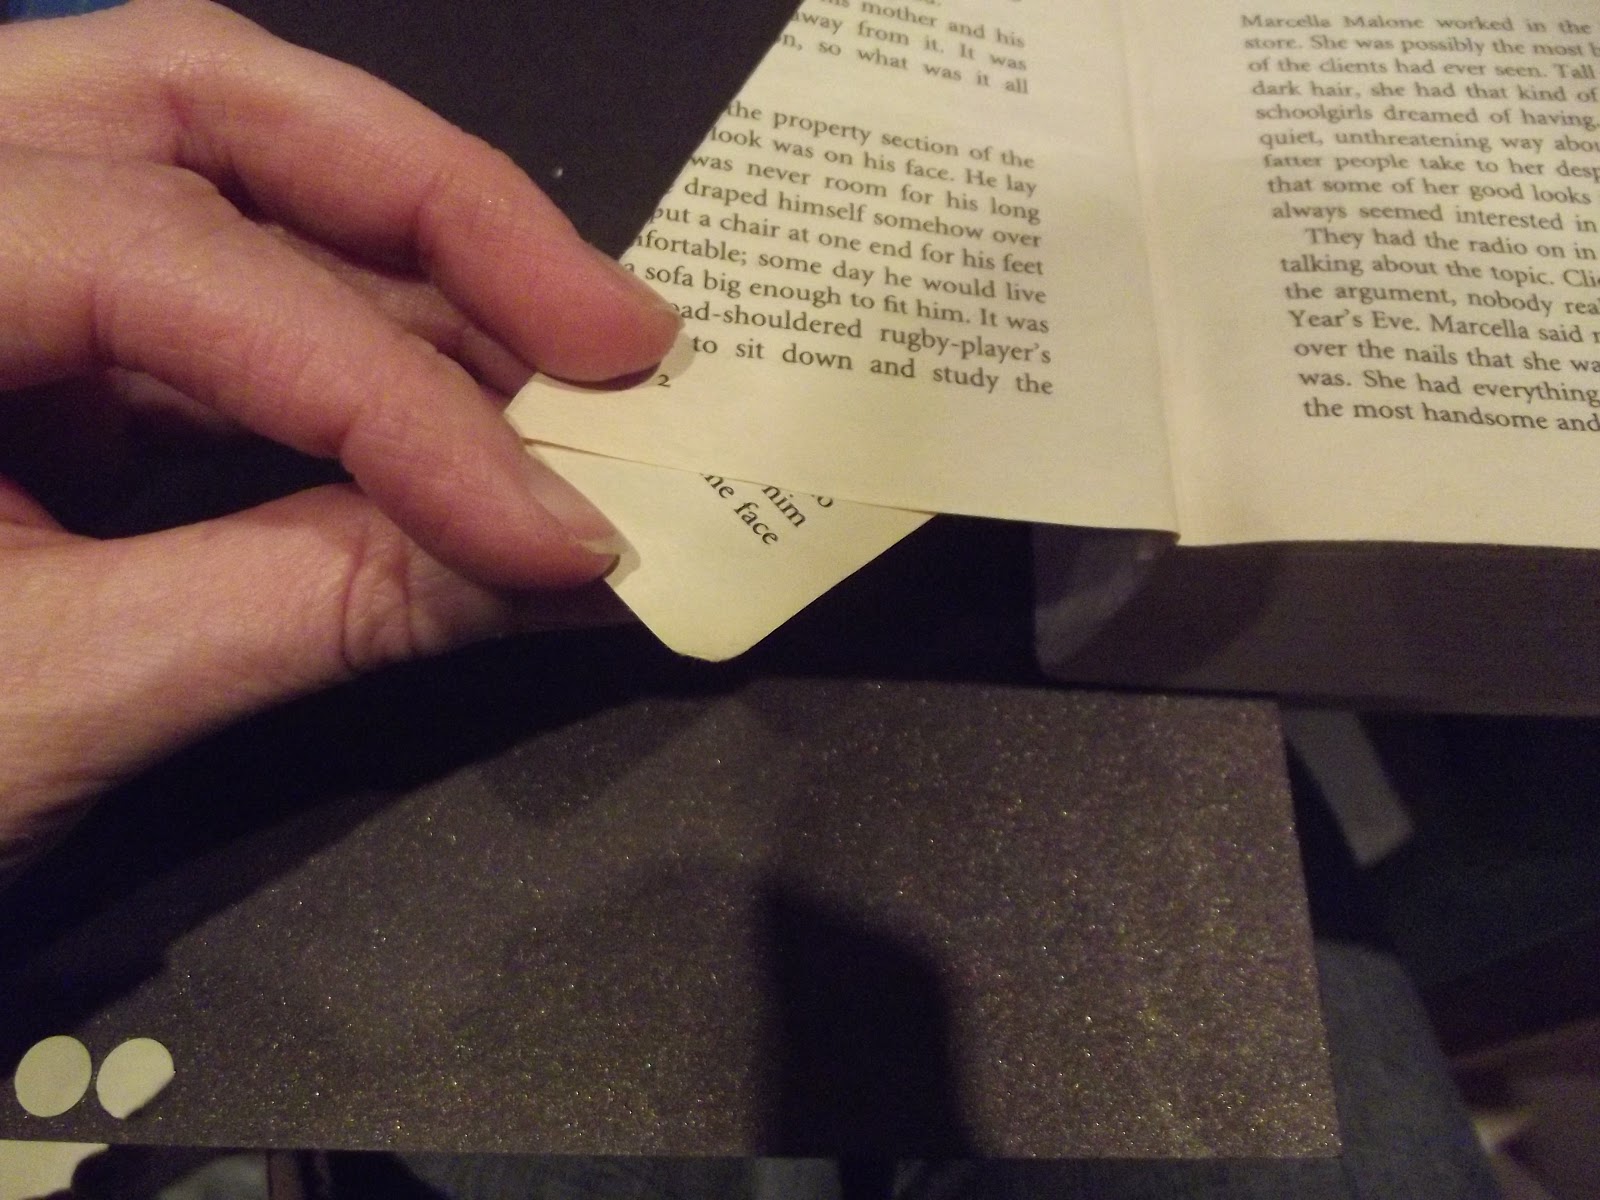
 Begin by folding the top right corner down till it reaches the spine... See below.
 Now fold this page over till it it level with the spine. Be sure to burnish the creases well.
 Turn the page over just as if you were reading the page. You will see you have a little tail poking out at the bottom. Fold this back up so that the edge is flush.
 Your page should now look like the one below.
 Continue to do this for each page. It will get harder as you go along.
 Your finished pages will look like this.... As you fold more and more pages you will notice how the tree is taking shape and that it requires NO glue to hold it together. The finished tree will be extremely solid and hold itself in position with no problem.

Once your tree is all folded you can decorate how you would like. To add colour to the tree just use a sponge and rub your chosen ink colour along the folded edges.

I hope this has inspired you all to give an old book a new lease of life.

Till next time - Happy Crafting
  

Vintage Christmas...

Firstly let me assure you book lovers out there that no book was harmed in the making of this decoration. It was a much unloved book lying at the bottom of a very dusty box until Saturday and now it is probably the most favourite of all my 3d work to date. It will be cherished for years. 

I have seen these floating about in cyberspace for some time and being the 'simple' girl I am thought them way too complicated and time consuming...... NOT SO!!!   
 This little tree came to life in 25 mins and was so easy  the Nutty one made one too! Of course his is paper engineering not paper crafting lol.
 The decoration took longer than the actual book as I wanted it to look just right but now that I know what I'm doing I think you could whip one of these beauties up in less than 2hrs. In fact it took me longer to find a book I could bear to bend pages on than it did to make the tree!

Although the book is not Stampin' Up! all the other products are... I used Naturals Ivory card stock for the banner. Early Espresso Tulle and Very Vanilla Seam Binding tied onto Linen Thread wrapped around the tree and are topped with Basic Rhinestones and Large Pearls. A little touch of sponging on the edge of the banner and the tree edges in Soft Suede to age the piece. I added a little Champagne Stampin' Glitter to the ends of the banner for a little sparkle. Finally I spritzed the whole piece in Shimmer Mist made using the Champagne Shimmer Paint.

I hope you enjoyed and if you would like to know how to make one for yourself then please ask about classes. 

Till next time - Happy Crafting

Wednesday 24 October 2012

WOYWW

Here we are again with another sneak peek at desks around the world with the lovely Julia and  WOYWW.

My desk is a cluttered mess this morning as I had a craft day yesterday and then parents eve so I didn't get the chance to tidy properly - that will be todays job lol.

 So as I have nothing exciting to show you on my desk I thought you might like to see the rest of the room.
 This is the card stock and DSP storage area....
and here is the stamp storage and bigshot area.

I hope you all have a wonderful Wednesday.

Till next time - Happy Crafting

Tuesday 23 October 2012

A celebration card...

Todays card is one I had to keep under wraps till I had delivered it on Sun. My lovely Stampin' Up! Mummy promoted to Gold 3 recently and this is the card I made to celebrate this outstanding achievement.

 Monica always sends out such lovely cards to her team for birthdays and promotions so I knew this one had to be a little special. I used More Mustard to represent the 'gold' and teamed it with Soft Suede and Naturals Ivory for a soft vintage feel. The letters are hand cut from the Letter It set and the No3 is from the corresponding Number It set. Fine feathers provided the background image and its a set that is fast becoming a firm favourite.
 As you can see from the 'arty' angle this was not a post friendly card. The No3 is mounted onto a rosette which was made using the Simply Scored. I added a little touch of Tulle in Early Espresso to soften the edges and add an extra texture to the card. The ruffled ribbon at the top is actually card which I stretched over the Bone Folder and then loosely folded into soft pleats. You need never be with out a matching ribbon again!

I hope you enjoyed today's card.

Till next time - Happy Crafting

Monday 22 October 2012

Training Swaps...

We all had a fab time at training yesterday and I came home with some lovely swaps. I have split them into 3 groups just for ease of posting.
The first group is the 'Christmas' themed swaps...

                                                                          Ann Wills
                                                                      Donna Keene
                                                                       Jane Hindry
                                                                        Becki Ritson
                                                                         Vannessa
                                                                              Vicky
                                                                         Sharon March
                                                                   Veronika Bartram

All the swaps were lovely and lots of hard work went into them all. I now have some additions to my wish list!!!

I will be back tomorrow with the 'Halloween' inspired swaps (my favourite of all the celebrations!)

Till then - Happy Crafting

Sunday 21 October 2012

Team Training...

A good many Passionettes and Demo's from around the country will be getting together today for a day of crafting and business training being run by the lovely Monica and Bekka. I am so excited to be part of the day and this will be my first training as a Passionette!

Whenever Demo's get together we swap projects which gives us all inspiration as well as a myriad of display items. We all have different styles so it is always good to see someone else's take on the items in our Catalogue.

My swap for today is designed to be a topper so that it can be mounted onto a card, scrapbook page or 3D item by the recipient.

 I used the Apothecary Accents dies to create the two shapes. I spritzed the Night of Navy cardstock with Platinum Shimmer Mist. On the Naturals Ivory centre panel I stamped the birds on a branch image from the Serene Silhouettes stamp set in Night of Navy before using the Spritzer Tool and Soft Suede Marker Pen to add some interest. I finished off with a sentiment from the Elements Of Style stamp set in Night of Navy punched out using the Designer Label punch. A little piece of Crochet Trim adds the final detail.
I hope you like my swap and I will be back tomorrow to share some of the lovliness I received in return.

Till next time - Happy Crafting

Saturday 20 October 2012

Late night crafter...

I've had this little piece of yumminess sitting on my desk for a few days after I rejected it as my swap for a team training day tomorrow. It was too cute to leave lying there so after finishing all my swaps I just had to create a little home for it. 
The image and flourish are part of the gorgeous Established Elegance stamp set in our current catty which I fell in love with straight away. 
 I stamped the image in Soft Suede onto Naturals Ivory cardstock and them embossed with one of the frames from the Designer Frames folders. I added a tiny sentiment from Lovely Little Labels and punched out using the matching punch pack. The flowers were punched out from Night Of Navy using the little flower from the  Itty Bitty Punch Pack.
Below is a close up of the Seam Binding in Very Vanilla which adds a elegant yet soft detail. It also shows the layers of Designer Series Papers from the Neutrals and Regals collections to co-ordinate with the colours chosen. A little faux stitching using a Night Of Navy Marker Pen adds the final detail on this tiny but perfectly formed little card.
 Here is the completed card... As you can see it has been distressed slightly to keep with the vintage feel of the overall look. A trio of pearls just finishes the flowers nicely.

I hope you enjoyed this card and I will be back tomorrow with my swap for the training day.

Till next time - Happy Crafting

Tuesday 16 October 2012

Cyber Crafting with the Passionettes...

A few of the Passionettes got together virtually on Sun for a fun eve of crafting and what better way to spend a cold Autumn eve...
Monica had sent us all a little 'kit' which consisted of 4 die cut pieces using DSP and the Labels Framelits plus a strip of Speciality DSP called Natural Composition. We were all eager to see what they would become but first the challenges....

Our first challenge was to use 2 Colours plus a Neutral, 2 Ribbons, 2 Pearls or Rhinestones, 1 Brad and 1 Punch. We had 45 mins to create, photograph and upload our pics to the Passionettes only site (more info on this exclusive site can be found on my Join My Team page). 


 This was my finished card and I have to tell you the crafting was a doddle compared to the uploading lol. I am probably the most tecnically challenged person there is and so I had to make sure I finished in plenty of time to do the technical stuff. I was really pleased with my card and several others must have liked it too as I won round one along with Debbie.


 The second challenge was to use the colour Blue and 2 different DSP's. I chose to do a 8x8 scrapbook page this time and took a pic of my Dad with my sister and I for the main image. I also had time to whip up this little card to go with it.


The last part of our eve was to make this GORGEOUS little bird house using the bits Monica had sent us. We were supplied with instructions to put it together but the decoration was up to us. I chose to stick as close to the original as was possible... after all "if it ain't broke dont fix it".

I will be back tomorrow with more in depth detail about each project and the materials used.

Till then - Happy Crafting

Thursday 4 October 2012

Back to scrapping...

My focus has been well and truely on cards for a while so I thought it time to get back to some scrapping. I have been inspired by some lovely layouts on my friend Cal's blog

It's been a couple of years (yes really that long!) since I last did a layout so looking at the 12 x12 page this morning gave me quite a fright I can tell you.

I have had some old photo booth photos of my Dad and I on my desk for quite a while so decided to give them a proper home today.

 This is the finished page. I found a basic page layout and added my own twist. The colours are Basic Black and Naturals Ivory for the main panels with Bravo Burgundy, Baja Breeze and River Rock as the accents. The Colour Coach came in handy when looking for colours to go with Bravo Burgundy.
 A close up of the circles. Punched from 3 different sized circle punches in the accent colours and placed randomly in the top right corner.
 I'm not a lover of 'white' space so the Spritzer Tool came in handy to add a bit of interest to the page. Do this before you stick the circles down so they stay clean of 'splodges which helps them to stand out even more.
 I used the larger of the tags to tuck behind the page for some hidden journalling. To stop the tag getting lost I tucked the page into the tag. I also created a little pocket using double sided tape to stop it slipping down completely which you can see below.
  I hope you enjoyed peeking at my foray back into scrapping and hopefully I will have lots more to show you soon.

Wednesday 3 October 2012

WOYWW #174

When is a desk not a desk???

When its a dumping ground for all the lovely new goodies you have. I know all of you who comment are amazed by the neatness of my desk and when I'm working it has to be that way or my brain can't function.

However (and here's the confession) it isn't always that way!
This was my desk last week... Why am I showing you last weeks desk I hear you ask? Well it's simply because whats on my desk this week needs to remain a secret for a couple more days and I thought you might like to see I can be messy too lol.

The red bag was on our desk at the retreat weekend I recently attended and was FULL of crafty goodies we would use over the weekend. Bags and boxes full of more crafty goodness from the shopping trips I took the crazy American on (well I couldn't let her get all the yumminess could I) and an old project from a retreat weekend I held here at home.

So as you can see it was a busy desk last week but I have to confess it didn't stay that way for long and I hope to be able to show you what I'm working on in the next couple of days.

Enjoy looking at the rest of the desks this week over at WOYWW

Till next time - Happy Crafting